Welcome to CutieCooks!

Linds and Ally here! We want to share our cooking experiences with you to help you start having a more fabulous experience in the kitchen. It is our mission to bring you simple yet deliciously healthy recipes that you can make in a flash! Thanks for visiting!
XOXO, CutieTwins

Aug 26, 2010

Watermelon Glazed Chicken with Corn and Blueberry Salad


Watermelon is a staple of Summer! It is served at almost every summer cookout or BBQ, adored by children and adults alike. It is so juicy and refreshing on those hot summer days, especially this summer! Plus, it's good for you! But what else can you do besides eat watermelon raw?

I discovered this summer that you can actually do a lot with it, including cook. So of course, I had to try it for myself! It was definitely a success, my family loved these recipes together. Much different than you might imagine just from hearing it but the Watermelon Glaze was the perfect mixture of sweet and spicy for a good summer meal. The Corn and Blueberry Salad was a great complement to cool the whole meal down while still adding its own unique flavors to the mix. It was a crowd pleaser to say the least!

Watermelon Glazed Chicken


Ingredients:

1 Watermelon glaze

3 1/2 lbs. meaty chicken pieces

1/2 tsp. kosher salt

fresh herbs (optional)


Instructions:

1) Prepare Watermelon Glaze; remove 1/3 cup and set aside.

Watermelon Glaze:

1 small watermelon

1 12-oz. jar of apple jelly (I used apple and cranberry chutney)

zest and juice of 1 small lime

2 tsp. red Chile flakes

1 tsp. jalapeno hot sauce or salsa

2) Cut half of the watermelon from the rind in to chunks and the other half in to wedges to serve with the chicken. Place chunks in a blender or juicer and blend until smooth. Pour into a fine mesh sieve over a bowl. Reserve 1 cup of the juice and discard the rest.

3) Melt jelly over low heat, stir often. Stir in 1 cup watermelon juice, lime juice and zest. Then add red Chile flakes, jalapeno hot sauce or salsa and a pinch of salt. Mix and taste. Use warm or let cool and refrigerate (will keep for 2 days).

4) Pat chicken dry with paper towels and prepare grill for indirect grilling.

5) Brush chicken with olive oil and salt and pepper both sides. Place skin down over indirect medium heat.

6) Grill 25 minutes. Turn chicken over and brush with glaze two more times. Let rest for 10 minutes. Serve with fresh watermelon wedges and sprinkle with fresh herbs.


Corn and Blueberry Salad


Ingredients:

6 ears fresh sweet corn

1 cup blueberries

1 small cucumber, sliced

1/4 cup red pepper (or red onion if you like), chopped

1/4 cup chopped cilantro

1 jalapeno pepper, finely chopped

Dressing:

2 tbsp. lime juice

2tbsp. olive oil

1 tbsp. honey

1/2 tsp. ground cumin

Instructions:

1) Bring salted water to a boil in a large pot. Add corn. Cook, covered, for 5 minute or until tender. Cool and cut corn off the cobs.
2) In a serving bowl, combine corn, blueberries, cucumber, red peppers (or red onion), cilantro, and jalapeno.
3) To make dressing, combine lime juice, oil, honey, cumin, and a 1/2 teaspoon salt in a screw top jar. Cover and shake well. Add to salad and toss!
The salad stays good if refrigerated for up to 24 hours. So make it in advance and sereve with the Watermelon Glased Chicken at your next cookout. I promise it will make the perfect end of summer meal and leave your guests begging you for the recipe!
Hope you enjoy!!
XOXO, CutieTwins
~*Please feel free to email us with any questions you may have at TheCutieCooks@gmail.com*~
~*Also, be sure to follow us on Facebook and Twitter*~

Aug 19, 2010

Never Skip Breakfast Again: 10 Fast and Healthy Fixes

For those of you who are either too rushed to eat breakfast or just need something quick to grab on the way to school or work, I have some easy ideas for the widespread breakfast dilemma so many of us seem to face!


Everyone knows breakfast is the most important meal of the day. So why do so many of us skip it? I used to be one of the many who would have way too many things to do in the morning to remember to eat breakfast. Once you're used to it its no big deal, right? Wrong!


My senior year of college, I finally started eating breakfast. Since then, I've learned that breakfast helps me eat healthier throughout the day, and keeps me much more satisfied. I have never been an early riser, so I had to find ways to make quick breakfasts that were yummy, healthy and sustainable throughout the day. Some of these are so easy, you won't believe it until you try it for yourself! And once you do, you will see that you no longer have any excuse to skip breakfast (or let your kids eat pop tarts anymore). Say hello to healthy eating and a happier healthier you!


1) Egg in a Mug Sandwich: Microwave an egg or 2 in a mug, either scrambled or not, for 30 seconds and place on a toasted whole wheat English muffin. Add cheese or bacon if you like.


2) Oatmeal: This is a healthy, fast meal that you can easily jazz up with your favorite fruits or spices like cinnamon, nutmeg, etc. The fiber in oatmeal will keep you satisfied all morning.


3) Greek yogurt parfait: Add your favorite fruits or berries to Greek yogurt for a delicious and nutritious breakfast. You can even pre-make this the night before to save time in the morning!


4) Instant muffin in a cup: Choose your favorite muffin mix or homemade recipe and whip up the batter at night. Keep refrigerated until morning. Pour muffin batter into a paper or plastic cup, fill half way and microwave for 30 seconds for a perfectly moist muffin. Serve with fresh fruit for a complete meal. Batter should stay fresh for up to one week.


5) Grapefruit: One of my personal morning favorites; I always sprinkle a little bit of sugar over the top of each grapefruit half. This is good for a morning when you are not too hungry but need a little something!


6) Scrambled eggs with cheese: Scrambled eggs take only minutes to make. I usually use one egg and one egg white, to cut the fat and cholesterol in half. If I'm in a hurry I just scramble with Swiss or feta cheese, but if I have a little extra time I add more goodies like peppers, mushrooms, spinach, artichoke hearts, or whatever else I have on hand at the time.


7) Frittatas: Whisk eggs together and add whatever veggies you like. Pour into a small pan and place in the oven for 10 minutes at 400 degrees. Frittatas are a fresh alternative from your daily scrambled eggs.


8) Cereal with fruit: Choose a healthy cereal, like any from the Kashi line, and add fresh fruit or nuts.


9) Fruit Smoothies: This is the perfect breakfast for a car ride commute to work. Take your favorite fruits like strawberries, blueberries, blackberries or raspberries, and blend them with Greek yogurt. You can use fresh fruit and add ice or frozen fruit works well, too. Pour into a glass for a meal on the go!


10) Stuffed mini crescent rolls: This is a super easy one that all kids are bound to love! Take Pillsbury mini crescent rolls and lay them out on a cookie sheet. Fill them with jam, chocolate chips or cheese and roll them up. Follow cooking directions on the container and serve with fresh fruit for extra nutrients.


Please feel free to email us at TheCutieCooks@gmail.com with any questions!!


~** Also, follow us on Facebook and Twitter **~


Special thanks to the fabulous Maggie Conner, follow her blog, TheHauteHoosier too!

Aug 9, 2010

Seven Must-Have Kitchen Gadgets for Under $30

Have you ever walked through William Sonoma and wanted everything in the store until you looked at a price tag? While gadgets and utensils can make our time in the kitchen easier and more fun, they’re not always nice to our pocketbooks. (Does anyone say “pocketbook” anymore?)

I’ve compiled a list of must-have kitchen gadgets that won’t break the bank. You can find all of the following goodies for $30 or less!

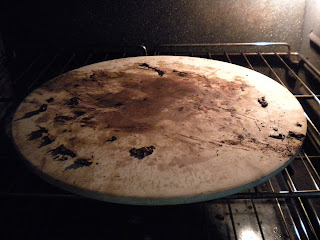
1. Pizza Baking Stone- I’ve mentioned my love for baking stones in my previous post, “Four Easy Steps to a Pizzeria-Tasting Pie at Home”. For around $30, you can pick one up just about anywhere that sells kitchen gadgets. The stone will ensure the perfect combination of a crispy yet chewy crust. The more you use it, the better your pizzas will taste. After your first run with a pizza baking stone, I’m confident you’ll agree it was $30 well spent. Note: The stones aren’t meant to be washed. I just keep mine on the bottom self of my oven. Crumbs and sauce overspill burn off.


2. Cheese Grater- Not only are they easy to use, but fresh grated cheese just tastes better! They come in all shapes, sizes and prices. I use a box cheese grater, which I got at Bed Bath and Beyond for about $20. It has four sides; each side grates the cheese a different size. My only complaint about using a cheese grater is cleaning it; it’s not easy. I usually try to scrape most of the cheese remains off with a brush then stick it in the dishwasher. Be careful when cleaning! The little grates are sharp and can tear up your sponge and fingers.


3. Microplane- Don’t need to grate an entire block of cheese? Try a microplane! They are perfect when you only need to grate a small amount of cheese or for zesting fruit. Plus, they’re much easier to clean than a box cheese grater. You can find them for as little as $9 at Zesco, a kitchen supply company in downtown Indianapolis. If you don’t live in the Indy area, no worries! You can order hundreds of kitchen goodies (for your home or restaurant) from Zesco online at http://www.zesco.com/ .


4. Salad Spinner- Costing only $10 at Bed Bath and Beyond, my salad spinner has been a real money saver! Instead of buying bagged salad, I now use my salad spinner to make my own vegetable combinations. I chop lettuce, carrots, green peppers, onions, (essentially whatever is in season) and throw them into the colander that sits inside of the spinner. In the colander, I wash all of the veggies then give them a spin. Spinning the veggies dry them and perfectly mixes them together. You can also store any extra salad in the spinner. Talk about multipurpose!


5. Spatula- No kitchen is complete without this classic go-to utensil. It makes EVERYTHING easier! Lindy Brown, who loves to bake, said the spatula is one kitchen utensil she wouldn’t live without. You can find them in just about any color and size you could imagine. One of my favorite spatulas actually has a conversion table on the back. I got it at home goods for around $5.


6. Whisk- Do yourself a favor, and get a whisk if you haven’t already. It is one of the most versatile utensils in the kitchen. They’re great for making everything from salad dressing to brownies. This is another of Lindy’s favorites. It makes whipping up a delicious breakfast- which Lindy loves to do for her family on the weekends- easier and faster. Lindy said, “In a pinch, I've made whipped cream with a whisk when I couldn't find the egg beater.” You can find them virtually anywhere that sells kitchen supplies for under $10.


7. Magnetic Knife Strip- Why not bring some of the conveniences of a commercial kitchen into your home? Place the magnetic knife strip on the wall where you do most of your food preparation. Annie Zoll, whose family has been in the kitchen supplies business for years, said, “I love the magnetic knife holder because it is easy to see, access and also it maintains a clean and clutter-free counter space or work top space!” You can find magnetic knife strips at Zesco for only $9.
If your kitchen is missing any of the above items, consider investing in them. After all, you could pick up all seven items for less than $100. That’s $100 well spent, in my opinion!

We would love to hear about any of your favorite utensils that didn’t make our list! Feel free to email us with any comments or questions at TheCutieCooks@gmail.com . Happy Cooking!

XOXO,
The CutieTwins

P.S. A special thanks to Lindy Brown and Annie Zoll for their input. You can follow them on Twitter- @LindyABrown and @AnnieZoll .

Jul 27, 2010

Four Easy Tips to Make a Pizzeria-Tasting Pie

Like so many people, I love pizza; it’s a staple in my diet. When I think about pizza, my mind usually conjures images of Pizzology (Indy), Bazbeaux (Indy) or Gino’s East (Chicago). A recent episode of a show called “Pizza Wars: NYC v. Chicago” recently brought my obsession into perspective. I have been to the every featured pizzeria in the episode, though I’ve never lived in either city.

As much as I enjoy the Italian goodness, I’m not a huge fan of oven pizzas. But sometimes it’s just so easy and convenient to pop a frozen pie in the oven. Over the years, I’ve learned a few tips to make oven pizza taste a little more like your favorite pizza joint. It may not exactly rival Pizzology or Bazbeaux, but with these simple tips, you can make a pizza in your kitchen that you’re proud of.


Tip #1: Get a pizza baking stone! For around $30, you can pick one up just about anywhere that sells kitchen gadgets. The stone will ensure the perfect combination of a crispy yet chewy crust. The more you use it, the better your pizzas will taste. After your first run with a pizza baking stone, I’m confident you’ll agree it was $30 well spent. Note: The stones aren’t meant to be washed. I keep mine on the bottom self of my oven. Crumbs and sauce overspill burn off.


Tip #2: Buy pizzas that are refrigerated, not frozen, with minimal toppings; add fresh toppings of your choice. My favorite at-home pizzas come from Whole Foods ($8-$10). The pies are always fresh. You can find them in the refrigerated food area. I pick up a simple cheese pizza then hit the produce department and deli for the rest of my ingredients. I buy fresh veggies and pepperoni that I add to the pizza when I get home. By adding fresh ingredients, it improves the texture and flavor of the pie.


Tip #3: Sprinkle the pizza with crushed red pepper. In my opinion, the sauces on take home pizzas leave much to be desired. I add a little crushed red pepper for an extra kick of flavor.


Tip #4: After slicing and plating the pizza, lightly drizzle it with a flavored olive oil. I prefer red pepper and chili infused olive oil- I discovered it about a year ago at a hole-in-the-wall NYC pizzeria. If you don’t like red pepper, you can get olive oils infused with numerous herbs and spices.


By following the four simple tips listed above, your oven pizzas will taste a little more like takeout.


Feel free to email us with any questions or comments! TheCutieCooks@gmail.com Happy Cooking!
XOXO,
The CutieTwins

Jun 10, 2010

'Tis the Season for Open Housing: How to Throw an Effortless Graduation Party


As alot of our loved ones are graduating at this time, there are a lot of parties to attend. If you're anything like my family, you get a ton of invites to these things and end up open house "hopping" every weekend from May through June!

So what happens when it comes time to throw your graduate an open house? Do you try to "one up" all the others, or try to plan so that you can enjouy your time with family and friends, unlike "Ms. Party Perfect"? We vote for the second option! Let's face it; we couldn't one up her anyways.

That doesn't mean that you can't have a chic party yourself, even on a budget. We are here to give you the 411 on how to throw an efforetlessly chic graduation open house! The key is to keep it light and refreshing, since most people bounce from open house to open house.

First, decide where you want to place the food buffet, as it is the focal point of the party. If you want it inside, the dining room or kitchen will work best. If you want the food outside, anywhere on a deck will work, although a screened-in porch keeps bugs away from food.

Food, although the focal point, should not be your biggest worry. Most people bounce from open house to open house and eat a little at each. So keep it simple. Pick something that will be effortless to keep fesh and at the right temperature. Here are some ideas:

- A taco or burrito bar, where people can create their own
- Pulled pork is a very easy food to either cater in or make yourself and keep warm in a crock pot
- Ham and turkey sandwiches, either catered in or homemade


For effortless side dishes, try a mix of any of these options:

- Fruit platter
- Veggie platter
- Cheese and cracker platter
-Potato salad, tuna salad, chicken salad and/or fruit salad


All of these can easily be homemade or bought pre-made at your local grocery store!

For easy desert options, if you so wish to serve desert, stick with summer staples like popsicles, ice cream sandwiches, or single serve ice cream cups. Place in coolers or bowls of ice to keep frozen.

And of course, use paper plates and plastic utensils to make clean up easy for guests. Place a couple of trash cans throughout the party in inconspicuous places.


Drinks should be the most effortless part. All you need are a few tubs or coolers filled with ice. Serve mini bottled waters and any assortment of mini sodas that you would like. Place tubs or coolers throughout the party, maybe one by the food and one outside, so guests can easily find refreshments!

If you want to serve adult beverages, do the same thing with wine and/or beer, placed in smaller tubs or buckets. I would advise only serving adualt beverages in one location so that you do not have to serve or buy as much.


Decorations should be minimal and easy to put up and take down. There is no reason to spend a fortune; you can probably find all you need at your local dollar store. Just be sure to use your grad's school colors.

For the most effortless decorating, stick with a "Congratulations Graduate" banner and some streamers and balloons placed around the party. For an added touch use colored table clothes and table skirts. You can also use colored paper plates and plastic utensils. Hanging flower baskets are also an easy added touch for outdoors, and they will last all summer with little maitenance.

One of the most important decorations to have are pictures of your grad! You can place them throughout the party on serving tables, or as center pieces or you can dedicate a single table or location for pictures and posters. Lay out your graduate's senior pictures so that people can take them as a memento. You can also make a banner that family and friends can sign that acts as a "guest book"!


Something fun my mom has done for each of the grads in my family is make a memory book of our entire lives. It is a great conversation piece to lay out in the living room as a coffee table book, or what have you. It is always a big hit and a great present that I have added on to as the years go by!

Lastly, and most importantly, ask one or two of your close friends or neighbors to come and help you do most of the restocking of drinks and food throughout the party. This will allow you to be stress free and enjoy visiting with family and friends.

Have fun planning and Happy Open Houseing!!

XOXO, CutieTwins


Please feel free to email us at TheCutieCooks@gmail.com with any questions or for more ideas or yummy recipes!


~*Also, follow us on Facebook and Twitter*~

May 31, 2010

How Many Miles are We Going Today? 500 Miles of Freedom!

For those of you who live in Indiana, you know exactly what I’m talking about-- The Indianapolis 500! It’s a weekend full of friends, food and racing. After one too many years of living off of doughnut holes and hot dogs for the entire weekend, I decided to put a little time and effort into this year’s menu. It was still easy (after all, it had to be doable after a few drinks), but this year it actually tasted good and didn’t totally destroy my budget or my waistline! The menu… (insert drum roll here)… fruit kabobs and hobo dinners. The perfect combination of class and tracktastic goodness!

You may find yourself thinking, “Ummm… Hobo dinner? What is a hobo dinner?”. It’s an absolutely delicious and EASY meal made on the grill that consists of veggies and meat. I grew up eating this recipe with my grandparents.


Okay, let's get started!

My shopping list: 4 cucumbers, a watermelon, strawberries (2 lbs.), a pineapple, baby carrots (1 bag), potatoes (about 5 large potatoes), 2 onions, a few ears of corn, smoked sausage (2 lbs.), butter, bottled water, kabob skewers, and aluminum foil

I prepared everything before we left for the track. The only thing I would need once I got to the track was a grill.

First I made the fruit kabobs. It couldn’t be easier to make these classy little treats. I cut the pineapple and watermelon into cubes, cut the tops of the strawberries and halved them (they were HUGE strawberries! No need to half them if they’re small) and roughly peeled and sliced the cucumbers. I then put them on the skewers- cucumber, strawberry, watermelon, pineapple, repeat once. They looked great and were amazingly refreshing in the 90 degree scorching hot sun. (The amount of fruit I bought made about 20 kabobs.)


Then I put everything together to make the hobo dinners. I roughly chopped all of the veggies and cut the smoked sausage into about 2 inch pieces. I threw everything in a cooler and headed to the Indianapolis Motor Speedway with my favorite friends.

When I got to the track, I used the aluminum foil to make pouches. I added about ¼ bottle of water, a pad of butter, a handful of the veggies and a few pieces of smoked sausage to each of the pouches. I sprinkled a little salt and pepper into each pouch and threw them on the grill for about 30 minutes (until the veggies become tender). Then, Wa La!, they were ready to eat. The flavor and aroma were so rich! Our hobo dinners totally beat the hamburgers and potato chip that our neighboring grillers were eating.

So easy and so yummy! I really only spent about 20 minutes total preparing everything, and my fellow race goers were more than pleased with the outcome. Twenty minutes well spent in my opinion!

Feel free to email us with any questions or comments. TheCutieCooks@gmail.com Happy cooking!

XOXO,
CutieTwins

May 26, 2010

Finding the CutieCook in Everyone

Hello and welcome! We are Linds and Ally, also dubbed the CutieCooks!

We believe that there is a CutieCook in everyone! Women should feel fearless and fabulous in the kitchen every single day. So we are here to act as a guide for those of you who find yourselves a bit intimidated by cooking or who are just looking for some yummy new recipes.

Do you ever find yourself thinking, “I’m over eating carry out for dinner five nights a week. Maybe I should actually fire up that big metal cube in my kitchen.”? If you have, we’ve got lots of tips to get you started making simple, healthy meals for yourself and those you love.

Most of us don’t have the time to spend hours a day preparing for each meal. If you’re anything like us, you have a lot going on these days, so grabbing take out on your way home from work or popping a frozen pizza in the oven is an easy solution to the never-ending “what’s for dinner?” dilemma. All of you women who spend your days juggling a million different things and don’t have much time to get in the kitchen have inspired us to share our simple and delicious recipes.

Our goal is to help you enjoy cooking and to create a healthier and happier society around us. Trust us, we were NO wonder in the kitchen before we set out on this quest…but we hope that you will see that if we can do it, so can you!!

We are going to start sharing some of our favorite quick, easy and healthy recipes with you! You can also visit our blog for video posts—a visual guide, if you will-- of us cooking some of those recipes and videos of the people around us who inspire us to become better cooks.

We are always open to your suggestions and/or requests! Feel free to email us with any questions or comments at TheCutieCooks@gmail.com.

You can also visit our Etsy store to learn more about CutieCooks and what we do at http://www.cutiecooks.etsy.com!

We hope you enjoy!

XOXO,

CutieTwins

~ Also follow us on Facebook and Twitter!! ~